
Google Analytics 4 (GA4) should be on every site owner and marketer’s radar. After Google’s announcement that it will officially sunset Universal Analytics (UA) in 2023, now is the time to set up your GA4 accounts — and sooner rather than later.
UA properties will stop processing new data by July 2023. Those who want to access their year-over-year data when UA sunsets should have completed their transition to GA4 by July 1, 2022.
But, if you haven’t completed your migration yet, it’s not too late. By transitioning your accounts today, you’ll have more comparison data for tomorrow and be better set for next year’s deadline.
In this blog, we’ll cover the basics of GA4, including some tips on how to set it up and prepare your site in time for the big transition.
What is Google Analytics 4?
GA4 is a new version of Google Analytics (GA) that delivers more accurate data insights. Built with machine learning at its core, it allows you to collect data across all devices and channels in one place.
The platform also makes it easier to get insights into your customers’ journey and to measure their conversions.
The best way to understand GA4 is by treating it like a complete rebuild of Analytics. It’s not an upgrade to UA; rather, it’s a re-engineering of the entire system.
That said, with the looming deadline for UA’s sunset, it is important to set up your GA4 property as soon as you can. Next summer might seem like a long way away, but it will be here before you know it!
The earlier you start tracking with GA4, the more data you’ll have on hand when the transition occurs.
Intro to Google Analytics 4: What Your Business Needs to Know
How to set up Google Analytics 4
GA4 is a powerful tool that can help you better understand your website traffic and customers. To make the most of it, preparing your site for the transition from UA is imperative.
We won’t be going too in-depth with setup instructions in this guide, because there are already many detailed step-by-step guides out there. Google alone is a treasure trove of resources to help you with your GA4 setup.
Instead, we’ll go through the most crucial things your business needs to do ASAP to get your site ready for the more technical elements of migration.
If you’re not doing the migration yourself, use these tips to prepare your site before working with an experienced professional.
Step 1: Create your GA4 property
You can create your new GA4 property in your existing Google Analytics account. You can also create a new account altogether (but only if you don’t have an existing UA property).
If you do have a UA property, we highly recommend creating your GA4 property in the same account. It will be easier to keep track of both properties, ensure that all your data is in one place, and compare your tracking throughout your setup process.
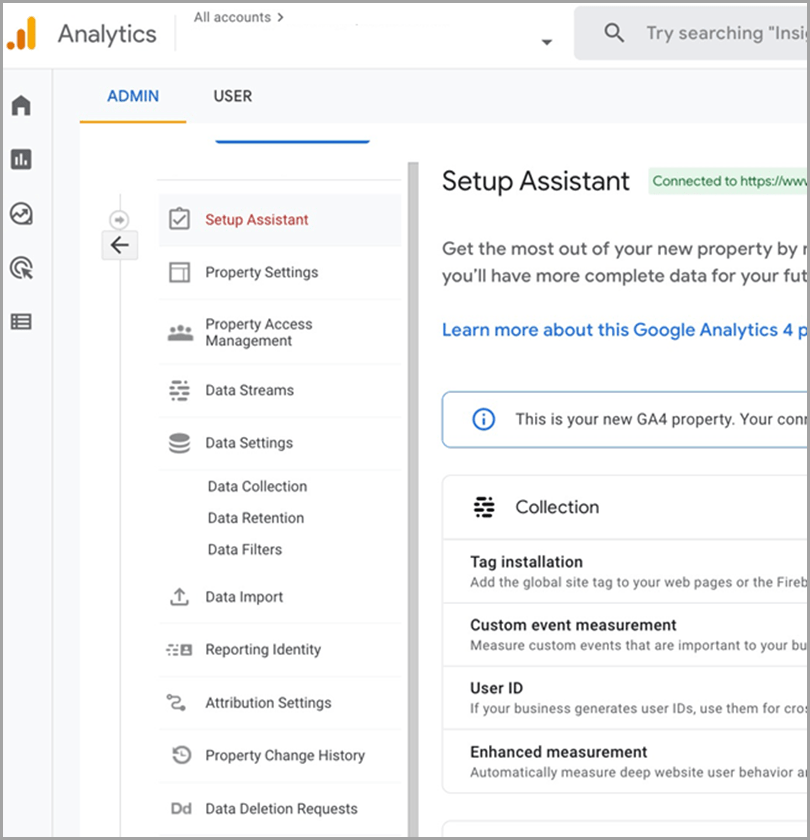
To create a GA4 property, sign in to your Google Analytics (Universal Analytics) account and navigate to the admin panel. Then, select the GA4 Setup Assistant link under the “Property” column.

This will take you to the GA4 property creation screen. Here, you’ll need to provide some basic information about your business and website. You’ll also decide how you want to collect data.
Under the section “I want to create a new Google Analytics 4 property,” choose “Get Started” from the drop-down menu.

Click “Create property.”
Google Analytics will automatically create the new GA4 property. To view it, hit the “See your GA property” button.
The next step is to activate Google Signals. This feature allows you to collect session data from Google users who are signed into their accounts.
From the left-hand-side menu, click “Set-Up Assistant,” then choose “Activate Google Signals” from the drop-down menu under “Property Settings.”

Click “Get Started,” then “Continue.”
Read the legal notice carefully. If your company qualifies, hit the blue “Activate” button.
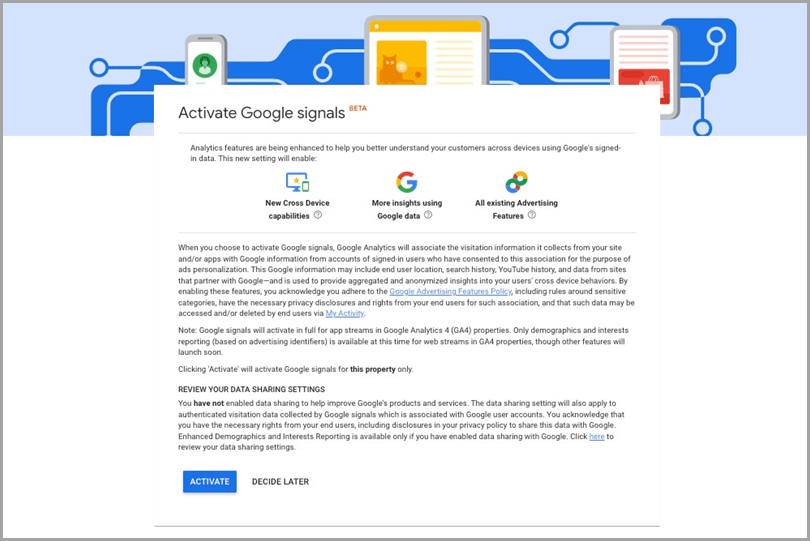
Next, under “User Data Collection Acknowledgement,” click “I acknowledge.”
Then, click “Data Retention” and change “Event Data Retention” to 14 months.
Hit “Save.”

And voila — your GA4 account is now created.
Step 2: Choose (and set up) your data streaming warehouse
As seen in the previous step, GA4 limits data retention to 14 months. Hence, you’ll ultimately need an external storage option to ensure that your historical data is retained.
Inflow’s clients use Big Query, which we recommend for affordable data storage. Here’s how to set it up:
- If you don’t already have one, create a free Google Cloud account.
- Log in to the Google APIs Console.
- Create a Google APIs Console project and give it a name. Use an identifiable name such as “[Your Company’s Name] Marketing Data Warehouse.”
- Click on the dropdown menu and choose “New Project.”

- Select the project you just created from the dropdown menu at the top portion of the screen.
- Navigate to the APIs table by opening the Navigation menu in the top-left corner. Click “APIs & Services,” then choose “Library.”

- Search for BigQuery API and click on it.
- On the following page, click “Manage,” then “Credentials” on the navigation.
- Add the credentials of the service account you’ll be using to access Big Query.
Note: These are just the basic steps for BigQuery setup. Read through Google’s complete guide for more details, including troubleshooting along the way.
Step 3: Link your existing accounts
This step integrates other tools in Google’s ecosystem into your GA4 property. That way, you can blend and analyze all of your data in one place, as well as use any Audiences you set up in GA4 inside Google Ads.
Some examples of existing accounts that you need to link to GA4 are:
- Your Google Ads account
- Your Big Query data warehouse
- Google Search Console
- Google Merchant Center
To do this, go to “Admin,” then navigate to Setup Assistant.
Go to the linking section and link each account as needed.
Step 4: Create a GA4 tag in GTM
On GA4, you’ll need to add GA4-specific tags for your accounts to begin gathering data.
To get started, create GA4 tags in GTM, as follows:
- Click “Tags,” and then “New.”
- Select “Tag Configuration” and then “Google Analytics: GA4 Configuration.”
- Enter your Measurement ID, which you can find on Setup Assistant (refer to Step 3).
- Publish your changes, and your GA4 accounts will start tracking!
To get your Measurement IDs from GA4’s Setup Assistant:
- Go to “Tag Installation.”
- Click on the web data stream.
- Copy the Measurement ID.
Step 5: Set up eCommerce and other conversion tracking
To track eCommerce conversions in GA4, you’ll need to set up enhanced eCommerce tracking. This will allow you to collect data on transactions, product views, checkout steps, and more.
Conversion (goal) tracking is very different in GA4 than UA, in that all conversions in GA4 are based on events.
For this reason, you won’t be able to automatically transfer your goal tracking setup to GA4. Instead, you’ll need to follow Google’s guidance to update each event’s parameters, so they appear accurately in your reports.
Our recommendation: Start with this guide to set up your purchase events.
Set up your GA4 accounts today
Google Analytics remains a powerful tool for businesses to track website and digital marketing data. But, with the upcoming GA4 mandate, you’ll now need to make some changes to continue tracking that data.
We cannot overstate the importance of setting up your GA4 account as early as possible. This is the only way for you to have enough time to troubleshoot your approach and fine-tune any issues before the summer 2023 deadline.
In this article, we’ve outlined the basic steps in migrating your accounts over to GA4. However, GA4 is much more involved than this. Remember: It’s a thorough revamp of Analytics, so don’t think you can complete a smooth setup of all your tracking in one day.
For best results, consider hiring a trained expert, such as a consultant or an agency, to help you complete this transition and set your reporting up for success.
In the meantime, start your DIY GA4 setup process now with these additional resources:
- How to Set Up Your Google Analytics 4 for Success | Search Engine Journal
- Set Up Analytics for a Website and/or App | Google
- How to Setup & Configure GA4 | Clue
Guest Author: Entrepreneur and digital marketer Mike Belasco has been the founder and CEO of eCommerce digital marketing agency Inflow since 2007. His background as a web developer and SEO expert built an agency that has worked with major brands like Amazon, Overstock.com, Dish Network, and many more. Today, Mike leads a team of more than 25 PPC, SEO, and conversion optimization specialists as a boutique, fully remote eCommerce marketing agency.
The post How to Set Up Google Analytics 4: What You Need to Know appeared first on Jeffbullas's Blog.
* This article was originally published here


No comments:
Post a Comment